
by Guest | Apr 22, 2017 | Eat Well
By Meghan Pientka, OSU Dietetic Intern, Oregon Dairy and Nutrition Council
Among the most lasting and powerful traditions in family life is one that seems to have more impact than almost any other – the family meal.
Family meals bring about family unity. Eating and talking together can help prevent behavior problems at home and school, can help reduce risk-taking behaviors like drinking and smoking, and may even help improve grades! When we eat together, we eat healthier foods and that leads to many other benefits, including making it easier for everyone to achieve a healthy weight.
Knowing how beneficial family meals are, the secret to making them a tradition for your family isn’t really a secret at all. Start with these three simple habits.
Habit #1: Making Meals Happen
Look for ways to add more family meals into each week. If evenings are too busy, breakfast or lunch on the weekends might work. Just keep trying to find the time and be a little flexible. Before you know it, family meals may even become a daily routine!
Try these ideas to help make mealtime happen:
- Keep it simple—collect go-to recipes that can help shorten meal prep time. www.foodhero.org is a great source of recipes, tips and ideas for meals.
- Choose ingredients that multitask—foods you can use for more than one meal can save time and avoid food waste. It takes the same amount of time to cook 2 cups of rice as it does to cook 4 cups! Save the extra for another meal in the same week.
- Just say no to take out—A recent study shows teens are two times more likely to become overweight or obese by eating just one weekly takeout or fast food meal. Use meal solutions like rotisserie chicken or pre-cut vegetables to get dinner on the table quickly without compromising nutrition.
Habit #2: Getting Kids Involved
This one is fun for everyone and it can happen anywhere — your kitchen, the grocery store or a backyard/community garden. Every activity can be a nutrition lesson. Kids can learn to sort foods into food groups. They can choose new foods they want to try from all colors of the rainbow. As children get older, they can help plan the menu at home and then pick out the foods to match the menu items while shopping.
Get kids involved in the whole mealtime—recruiting the kids to set the table, pour drinks, chop veggies, or stir the pot doesn’t just save time, it’s fun and it shows kids the value of cooking and eating together as a family. Everyone can help with the dishes, too!
Habit #3: Making meals easy and healthy

Planning meals ahead of time and making a list saves time and helps you pack meals with nutrient-rich food. So before you head to the store, think about these healthy ways to shop:
- Fill your cart with foods from each of the five food groups: grains, fruits, veggies, dairy and protein.
- Choose high-fiber foods like whole-grain breads and cereals, veggies, fruits, dry beans, nuts and seeds.
- Save money and cut down on sugar intake by drinking water instead of buying juice or soda.
- Make sure low-fat milk is in the fridge and on the table at mealtime.
Click here for more tips about nutrition and eating together form the Nutrition Council of Oregon.

Beef and Broccoli Stroganoff
Recipe Source: Nutrition Council of Oregon, Shared Meals
Serves: 4
Cook time: 20 minutes
Ingredients:
| ¾ pound |
Beef sirloin, thinly sliced |
| 2 ½ cups |
Broccoli florets |
| 10 |
Large mushrooms, sliced |
| 2 |
Green onions, sliced |
| 2 |
Cloves garlic, minced |
| 3 Tablespoons |
Flour |
| 1 cup |
Low-fat milk |
| 1 Tablespoon |
Soy sauce |
| ½ cup |
Dry white wine or water |
| 1 ½ cups |
Fat-free sour cream |
| ¼ cup |
Parmesan cheese, grated |
| 4 cups |
Cooked brown rice |
Directions:
- In a large nonstick skillet, stir-fry beef until browned
- Add veggies, onions and garlic. Stir-fry over medium heat 3-5 minutes
- Add flour and stir to coat all veggies
- Stir in milk and soy sauce; cook and stir until mixture is thickened and bubbly
- Add wine or water. Slowly add sour cream and parmesan cheese. Cook over medium heat until just heated through; do not boil
- Serve over rice
by Guest | Apr 5, 2017 | Eat Well
by Jessica Linnell, Assistant Professor of Practice, Family and Community Health, OSU Extension Tillamook County
March was National Nutrition Month, and one of the key messages is to include a variety of your favorite, healthful foods every month. This message is a good reminder that healthy eating also includes enjoyment of our favorite foods. In addition to supporting a healthy body, food also plays a central role in family and cultural traditions, social gatherings, and celebrations. What are some of your favorite healthy foods? How you can include your favorite healthy foods into your day?
When I think about my favorite foods, I think about potatoes. These are one of my favorite foods because they are delicious, nutritious, and versatile, and you will always find them in my pantry. According to studies, most Americans eat potatoes in the form of potato chips and french-fries. While delicious, these foods also contain many calories, few nutrients, and are better to enjoy only occasionally. However, potatoes can be a delicious healthy food when they are prepared in other ways.
Did you know that potatoes have more potassium than a banana?
One large, russet potato with the skin, has 1.6 grams of potassium, which is more than 30% of your daily needs. Did you know it also contains more than 25% of the vitamin C you need in a day? Potato skins also have a lot of fiber. While large russets are 290 calories, they can be part of a healthy diet because they are an excellent source of these important nutrients.
Explore the rainbow of potatoes!
Potatoes come in a variety of colors and sizes. The potatoes I use most often are Yukon Gold because of their lovely yellow color and buttery flavor. I also really like red potatoes and like to throw them in the bottom of my roasting pan when roasting a chicken. I really love fingerling potatoes. These small, skinny potatoes are excellent when tossed with a little olive oil, sprinkled with salt, and roasted until their papery skins are wonderfully crisp and delicious. Perhaps my absolute favorite, when I can find them, are the beautiful purple potatoes. They are delicious and add wonderful color. I love to combine them with red and yellow potatoes to make a rainbow potato salad.
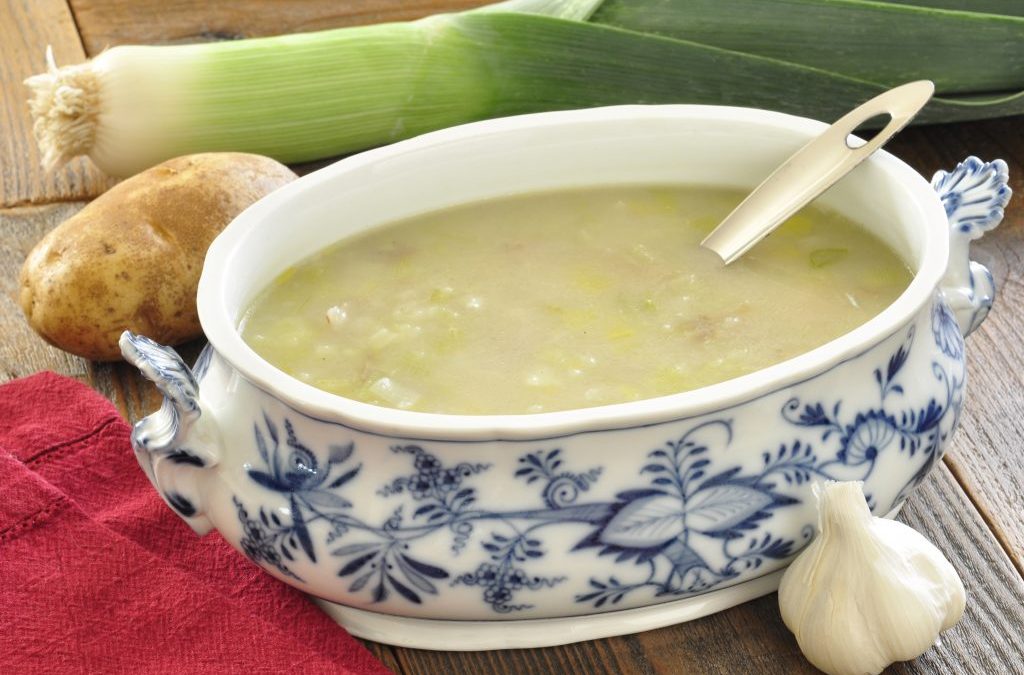
When it comes to my favorite dishes that include potatoes, one at the top of the list is beef stew. With hearty pieces of beef swimming in a delicious gravy with potatoes, carrots, and sometimes parsnips and other root vegetables. Another favorite is baked potatoes with crispy skin and topped with black beans, green onions, salsa, and cheese. During springtime my favorite potato recipe is potato leek soup, when the leeks are in season. It’s a wonderful side dish for a big meal, or can be a simple lunch or light dinner.
Creamy Potato Leek Soup
Food Hero www.foodhero.org
Number of servings: 8 cups
Ingredients:
3 leeks (about 3 cups diced)
3 potatoes (about 3 cups diced)
2 Tablespoons butter or margarine
4 1⁄2 cups chicken broth
1⁄4 cup 1% milk
2 garlic cloves, minced or 1/2 teaspoon garlic powder
1⁄2 teaspoon black pepper
Directions:
Prep time: 30 minutes. Cooking time: 30 minutes
Remove root and green tops from leeks. Slice in half lengthwise and rinse well under running water. Slice crosswise into ¼ inch slices.
Scrub potatoes well; cut into small cubes.
Melt butter or margarine in a 2-quart saucepan over medium heat.
Add garlic and chopped leeks. Cook until softened.
Add potatoes and enough broth to cover. Cover pan and simmer until potatoes are soft. Mash with a potato masher or fork until potatoes are fairly smooth.
Add remaining broth, milk and pepper. Simmer for about 5 minutes.
Refrigerate leftovers within 2 hours.
by Guest | Mar 31, 2017 | Eat Well
Who doesn’t want to live a stronger, healthier and happier life?
All were elements of Judy Barbe’s Eating Well, Being Well workshop in Tillamook on Saturday, March 11. Barbe is a Registered Dietitian Nutritionist and a nationally-known author and speaker, and her appearance was sponsored by the Oregon Dairy and Nutrition Council OSU Extension, Oregon Food Bank and YOW.
Organized by the Tillamook County Year of Wellness Nutrition Committee, and led by Oregon State University Extension Professor Jessica Linnell, PhD, the event drew more than 70 attendees, including all ages and walks of life. In addition to Tillamook Mayor Suzanne Weber and Commissioner Bill Baertlein, dairy representatives included local dairy farmers Julie Lourenzo and Joanne Seals, as well as Dairy Extension County Leader Troy Downing.
Judy Barbe engaged the audience in exercises aimed at assessing their food and lifestyle choices along with some goal setting activities to make improvements. She made an impression. One of the attendees said, “I am going to lose the prejudices I’ve formed about several food groups.”
 Another later posted a picture of his notes from the presentation posted on his refrigerator at home. Still another Tweeted about her meal prepping after the workshop.
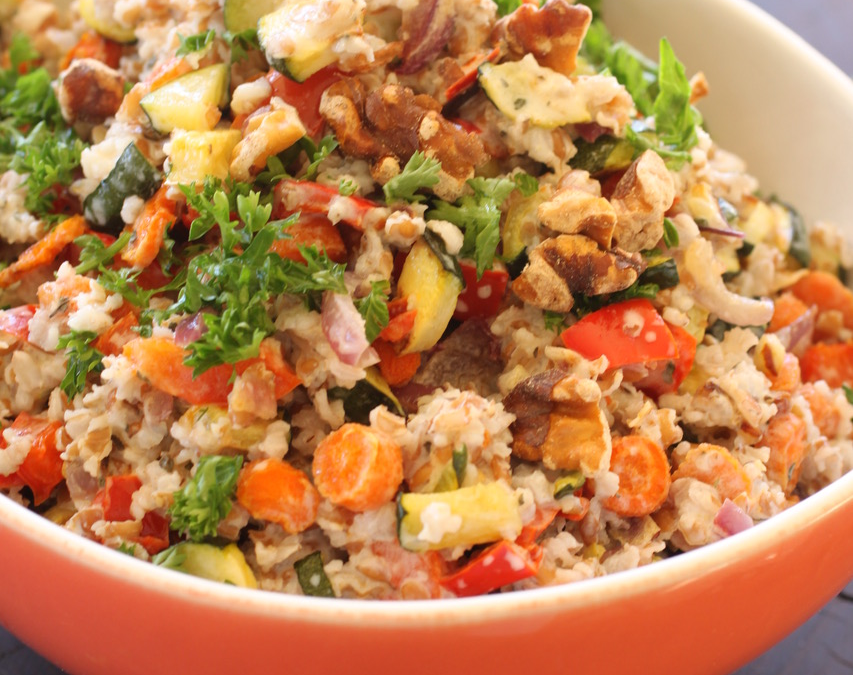
Barbe gave positive “dairy deliciousness” food suggestions and addressed the health benefits of consuming real dairy. She answered questions about dairy fat and alternative beverages. Hallie Hopkins with Oregon State University Extension Service provided a tasty and instructive food demonstration with bulgur, roasted vegetables and a yogurt dressing made with donated Tillamook yogurt.
“The workshop concluded with participants sharing the goals they set for themselves based on what they learned,” said Anne Goetze, Senior Director of Nutrition Affairs for the Oregon Dairy and Nutrition Council. “People left motivated to make positive changes.”
Here is the recipe for the Roasted Vegetable Bulgur Salad sampled at the event.
Roasted Vegetable Bulgur Salad
Roasted vegetables, whole-grain bulgur and a herbed yogurt dressing make this salad delish and nutrish. Substitute vegetables you have on hand red cabbage, butternut squash, eggplant, beets, cauliflower, sweet potatoes or broccoli. No raisins? Try cranberries, apples or pomegranate seeds.
You can speed the process by combining bulgur and water in a saucepan. Bring to a boil, then reduce heat to a simmer. Cover and cook for 15 minutes.
Whatever spin you put on it, each bite will deliver taste and health, all on the same fork!
1 cup bulgur
2 cups water
1 red pepper, diced
1 zucchini, diced
1/2 onion, diced
1 cup carrots, diced
2 teaspoons olive oil
3/4 cup Greek-style plain yogurt
1/2 teaspoon ground cumin
1/2 teaspoon dried oregano
1/2 teaspoon dried basil
1/2 teaspoon salt
1/8 teaspoon dried chile flakes
1/4 teaspoon ground black pepper
1/4 cup parsley, chopped
2 tablespoons raisins
1/2 lemon, juiced
2 tablespoons walnuts, toasted, coarsely chopped
Presoak bulgur. In a quart-sized bowl, stir bulgur and water together. Allow to sit 1 hour as bulgur absorbs water. This can be done a day or 2 ahead of time. Refrigerate after water is absorbed.
Heat oven to 425°F.
Place vegetables on baking sheet. Drizzle with olive oil, spread in a single layer. Bake 20-25 minutes until lightly browned and cooked until softened but still have a ‘bite” to them. Set aside to cool.
While vegetables are roasting, in a separate bowl combine yogurt, cumin, oregano, basil, salt, dried chile flakes, and black pepper.
In a large bowl, combine bulgur, roasted vegetables, yogurt herb dressing, parsley, raisins, and lemon juice. Stir to blend. Sprinkle walnuts over before serving.
Yield: 5 cups
Recipe source: Judy Barbe, www.LiveBest.info
Judy Barbe is a registered dietitian, speaker and author of Your 6-Week Guide to LiveBest: Simple Solutions for Fresh Food & Well-Being. Visit her website www.LiveBest.info for every day food solutions. What are you waiting for?

by Guest | Mar 15, 2017 | Eat Well, Recipes
Every vegetable has its season, and for me, a favorite is “asparagus” season – when the first early Spring crops arrive and the price per pound drops. There are so many ways to prepare asparagus – classic steamed; drizzled with olive oil and balsamic vinegar and roast with garlic of course; and pickled. Yes, pickled asparagus spears – oh, yum!
One of our family traditions is to prepare “Spring Asparagus Soup” for St. Patrick’s Day on March 17th. It’s perfect for our Irish heritage (my mom’s maiden name was Fitzpatrick) to have green soup and corned beef. This is a quick and easy soup to prepare, low in calories and asparagus is such a nutrient rich vegetable.
Asparagus is a young tender shoot (spear) vegetable, which emerges from its underground root system. Their use as food was well recognized by the ancient Greeks and Romans as a prized delicacy. One of the oldest recorded vegetables, its thought to have originated along the coastal regions of eastern Mediterranean and Asia Minor regions. Botanically, it is a herbaceous perennial plant (meaning it will come back year after year with a little attention and maintenance) belonging to the Asparagaceae family. It is closely related to the Liliaceae plants which also include onion, garlic, tulip, daffodil, etc – all the heralds of Spring. Plant asparagus crowns in early spring, and once established, this plant can provide an abundance of healthy spears after a couple years. Young scaly edible spears emerge from the underground extensive matted root systems, which can be ready for harvest in early Spring in some areas, usually by late Spring here on the Oregon Coast. When I see my asparagus making an appearance in the garden, that’s when I know it’s Spring.
Asparagus is a very low-calorie vegetable. 1 cup (134 g) fresh spears carry just 40 calories. Fresh asparagus is a good source of dietary fiber, Vitamins A, C, E and K, as well as the B vitamins. Asparagus is an excellent source of minerals, copper, iron,. calcium, potassium, manganese, and phosphorus.
This is soup is so easy to prepare, elegant and very nourishing. Serve it for your St. Patrick’s Day meal or for Easter dinner, and when it’s spring asparagus season – stock up! The soup freezes well, too. You can use vegetable stock and then it is vegan/vegetarian and is also gluten-free.
SPRING ASPARAGUS SOUP
2 1/2 lbs. asparagus
3 T. butter
1/2 C. minced onion
4-6 cloves of garlic, minced
1/2 t. ground coriander
4-6 C. chicken or vegetable stock
Salt and White Pepper
- Steam asparagus to tender, bright green.
- Cut tips and reserve. Cut remaining stalks into 1″ pieces.
- Sauté onion, garlic and coriander in butter in large heavy pan, until soft, not browned.
- Add asparagus stalks. Simmer 10 minutes
- Puree in blender or with submersible blender
- Pour back in pan; add asparagus tips. Heat to hot.
- Add white pepper and salt to taste.
Serves 8

by Guest | Feb 12, 2017 | Eat Well

by Guest | Feb 5, 2017 | Eat Well
By Erin Wisbey Martin M.D.
Cardiovascular disease (CVD) remains the leading cause of death in the US. There are five risk factors for CVD: high cholesterol, diabetes, high blood pressure, obesity, and smoking. These risks accounted for half of the CVD deaths in US adults but can be reduced with simple lifestyle changes. In particular, two areas of focus for the Year of Wellness, healthy eating and regular exercise to maintain an ideal weight have been shown to decrease these risk factors. A healthy eating includes daily consumption of fruits and vegetables, adequate fiber, foods with a low glycemic index (low carbohydrate/sugar foods), and healthy fats.
A primarily plant based diet is one aspect of healthy eating. The recommended intake is at least five servings of fruits and/or vegetables every day. Make them part of every meal. Keeping a bowl of fruit out will encourage healthy snacking for kids and adults. This will help increase fiber intake which has been shown to decrease the risk of coronary artery disease and colon cancer. Fiber is also great at helping to control blood sugar in people who have diabetes.
Grains with a lower glycemic index tend to be foods that are less processed such as 100% whole wheat bread/pasta, steel cut oats and brown rice. These should be chosen over refined grains and simple sugars such as white bread and rice, tortillas, potatoes, pasta, or dessert. A hidden source of carbohydrates (sugars) many of us don’t consider are the beverages we consume. Soda, sweetened drinks and even fruit juices are loaded with sugar and empty calories. Choose water or a piece of whole fruit instead. Moderate consumption of lower glycemic index foods and beverages has been shown to help with weight loss and a decreased risk of diabetes.
The types of fat we eat may be more important than the total amount of fat. The different types of fat can seem confusing, but the main point is that unsaturated fats from plants (seeds/nuts) are healthier than saturated fats from animals (butter/bacon) and synthetic trans fats (margarine/deep fried foods/commercial bakery treats). Omega 3 fatty acids have long been known to be a very healthy fat, these are found in certain seeds (flax seed) and fish (salmon). When cutting back on fats, it’s important not to replace these calories with carbohydrates. Instead replace them with plant based foods and lean sources of protein like tofu, beans or chicken breast.
Too much of a good thing, even “healthy foods”, can lead to overconsumption of calories and obesity. It’s very important to have a general idea of how many calories you should be eating per day. I recommend an honest discussion with your doctor to get an estimate of this. Metabolic needs depend on your age/height/weight/sex and actual activity level (not the exercise you aspire to do). Reading food labels is the next step to managing calories. The appropriate serving size corresponds to the accurate number of calories. If you eat two to three times the recommended small bowl of cereal for example, the calories you consume will increase exponentially. And as Americans, we classically consume unnecessarily large serving sizes. Portion control is key to preventing obesity and maintaining good cardiovascular health.
An excellent local resource to learn more about heart healthy nutrition is CHIP (Complete Health Improvement Program). There are classes currently underway, and the next session will start in mid-March with a CHIP Information session on March 14 or March 16 from 6:30-7:30 p.m. For more information, contact Ginny Gabel, RN at Tillamook Regional Medical Center, 503-815-2270.
Dr. Erin Wisbey Martin sees patients at Adventist Health Medical Group – Manzanita Urgent, Primary and Specialty Care. Her specialties are family medicine and obstretics.


