8 to 16 cups fresh or frozen vegetable scraps (see Notes)
herbs and spices (optional, see Notes)
water
1/2 to 1 teaspoon salt
Directions
Wash hands with soap and water.
Put vegetable scraps and herbs and spices, if desired, in a large saucepan or cooking pot. Add enough water to cover them.
Heat pan on high until water boils, then cover pan and reduce heat. Simmer for at least 30 minutes or until all scraps are soft. Stir a few times and add more water, if needed, to keep scraps mostly covered.
Turn off heat. Scoop out as many scraps as you can with a spoon. If you want, press on scraps to remove more liquid. Throw away or compost them.
Fill a large container or clean sink with ice and some water to make an ice bath. Put pan into ice bath for about 15 minutes, stirring every few minutes to release heat. If you were unable to remove all scrap pieces, pour broth through a strainer into another large pot.
Stir in salt to dissolve. Use broth for soups or stews, or in place of water for cooking grains or beans.
If not using broth right away, store in refrigerator or freezer. To freeze, pour into recipe-sized freezer-safe containers and label with date.
Broth can be stored safely in the refrigerator for 3 to 4 days. For best quality, use frozen broth within 2 to 3 months.
Notes
Label a freezer container with “Broth Scraps” and the date. For the next several days or weeks, after preparing vegetables for any use, save scraps in the container until you have enough for making broth. Also wash and save any vegetables that have passed their peak freshness but are still safe to eat.
Vegetable scraps to save include ends, peels, stems, leaves and pieces of vegetables and herbs such as carrot, celery, garlic, leek, mushroom, onion, tomato, parsley and thyme.
Vegetable scraps to limit or avoid:
Asparagus, broccoli, Brussels sprouts, cabbage, cauliflower and leafy greens can add a bitter flavor if too many are used.
Beets will add a dark color and bitter flavor.
Potato, sweet potato and winter squash flesh can make the broth too thick.
Scraps that are moldy, slimy or otherwise unsafe to eat should never be used.
Optional herbs and spices:
1 or 2 bay leaves
1 or 2 teaspoons peppercorns or a dried chile
4 to 8 cloves unpeeled garlic
1 leek or unpeeled onion, cut in large pieces (if not included as scraps)
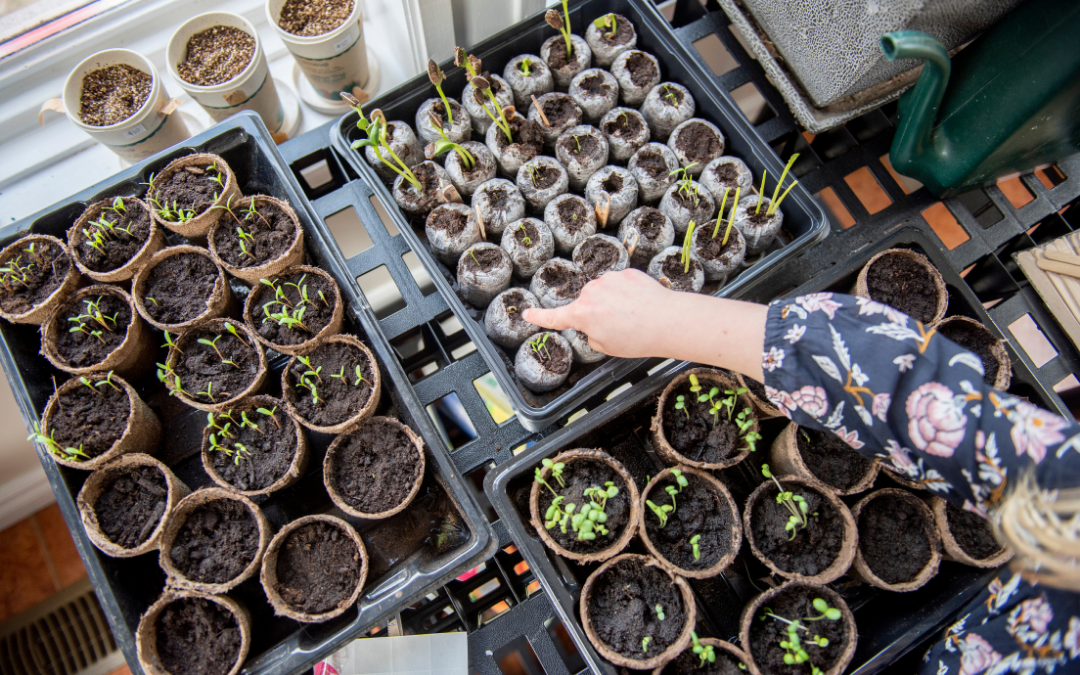
The calendar doesn’t say spring, but gardeners are ready to go. Turning vegetable seeds into plants helps satisfy the urge to put hands in the soil. And the seed catalogs are showing up in mailboxes.
It’s best to seed cool-season crops such as lettuce, cabbage, kale and broccoli in flats in late February to early March in western Oregon. Warm-season crops such as tomatoes, peppers and eggplant should be sown in late March to early April.
Back up your seed-starting date from the dates when you want to transplant, for most crops that would be just after the last frost date in your area. In Tillamook County that is generally Mother’s Day, but there are various “micro-climates” in the county. For example, closer to the beach there is less likely chance of frost after the end of April, but up the river valleys, there could be a hard frost in mid-May. Check with the OSU Extension Office in Tillamook for more information about seed starting.
Germination starts when the seed takes up water, a process called imbibition.
During this fragile time in the life of a plant, it’s critical that seeds receive appropriate amounts of water, oxygen and light. At this point, starting seeds becomes a balancing act.
Seeds need enough water for imbibition, but if they get too much it can suffocate the developing seed or lead to root rot. If the soil temperatures are too cool, the seed won’t germinate and cold soil temperatures could also lead to damping-off, a disease caused by soil fungi.
To successfully start seeds, first select and clean the right container, such as plastic flats or repurposed yogurt containers with adequate drainage. Sterilize the containers if they have been in contact with soil in a bleach solution of one part bleach to nine parts water. It is possible to grow seedlings in biodegradable pots fashioned out of newspaper or eggshell cartons, but the material takes a long time to break down in the soil after transplanting and the plant starts might not become well-established.
Next, find a seed starting mix at your local nursery or garden supply store. These mixes are not actually soil, but rather a sterile growing medium used to support growth, generally consisting of organic materials such as peat moss or coconut fiber and perlite. The seeding material will retain water for seed germination and seedling growth and also drain well. Place the flats on a seedling heat mat, which can be purchased at nurseries and garden supply stores. The mat will heat the seeding material to promote quick germination.
It’s important to have enough light. Use high-input grow lights or standard shop lights with fluorescent bulbs. Position the lights about 2 inches above the flat and move the shop lights up as the seedlings start to grow.
To tell if the seeds are getting enough water, the growing medium should always feel damp to the touch just under the surface. Using a spray bottle is the most efficient way to water.
As they get larger some plants like tomatoes and melons should be “stepped up” from flats into a 4-inch pot and then potentially into a gallon-size pot prior to transplanting.
Local garden coach, Master Gardener Karen Matthews, has been teaching seed-starting workshops at Alder Creek Farm for more than a decade. For a comprehensive video about her tried and true methods for seed starting, see the video below for tips and how-tos: https://youtu.be/kYB-ocGihBc
The OSU Extension guide also offers additional advice on starting seeds and a calendar of dates for planting various vegetables. Explore more resources from OSU Extension here.
Source: Kym Pokorny, OSU Communications
AUTHOR: Laura Swanson, Tillamook County Pioneer Editor
seasoning (such as salt, pepper, seasoning salt, onion powder or garlic powder)
Directions
Wash hands with soap and water.
Season the chicken. In a lightly oiled skillet over medium-high heat, sauté the chicken for one minute on each side until lightly browned.
Cover the skillet with a tight-fitting lid. Reduce the heat to low. Cook for 10 minutes. Do not lift the lid.
Turn off the heat. Let the chicken rest for 10 minutes. Do not remove the lid.
The chicken is safely cooked when the internal temperature is at least 165 degrees F. Check in the thickest part with a food thermometer. If not done, cover and return to low heat for 3 to 5 minutes and check for doneness.
Refrigerate leftovers within 2 hours or freeze for longer storage.
Notes
Do not rinse raw chicken; cooking will kill bacteria.
Wash hands and all surfaces and utensils after touching raw chicken.
1 ½ cups corn (canned and drained, frozen, or fresh cooked)
1 can (15 ounces) red kidney beans, drained and rinsed
½ cup grated cheddar cheese
Directions
Wash hands with soap and water.
Cook ground beef, onion and green pepper in large skillet over medium heat (300 degrees F in an electric skillet) until hamburger is no longer pink. Drain excess fat from pan (see Notes).
Add water, rice, garlic powder, chili powder, salt, pepper, tomatoes with juice, corn and beans.
Cover the pan and cook for about 20 minutes or until rice is soft.
Remove from heat, sprinkle with grated cheese and serve hot.
Refrigerate leftovers within 2 hours.
Notes
Garnish this dish with a tablespoon of low-fat sour cream.
Flavor boosters: green chilis, jalepeños, more garlic, and other seasonings.
Make extra! Leftovers make a great filling for tacos, burritos, filling for stuffed bell peppers, or as a topping for baked potatoes.
Use whole grains! Use brown rice instead of white rice and increase cooking time to 45 minutes or until rice is cooked.
Cook your own dry beans. One can (15 ounces) is about 1 1/2 to 1 3/4 cups drained beans.
Pour fat from cooked meat into a metal container. Let it cool, then dispose of it in a garbage can.
When we think about our wellness, diet, exercise, and mental health come to mind. In today’s post, we share why your finances should be added to that list – a concept known as “financial wellness.” There is more to cover on this topic than what can fit in a single blog post, so keep an eye out for more information on financial wellness in the future!
A plan for physical wellness might include signing up for a yoga class or doing meal prep on Sundays to make eating healthy easier during the week. A plan for financial wellness includes utilizing tools, as well as developing an understanding of how stress and emotions can play a role in sticking to the plan. Let’s start with one of the most important tools: budgeting. Budgeting keeps track of your income and expenses over a period of time and provides you with information to build long term financial goals, like retirement savings. The elements of a monthly budget include:
Income (any money coming in, like a paycheck),
Fixed expenses (things that you need to pay for each month like rent, a mortgage, groceries, credit card bill and the power bill)
Flexible expenses (things that you don’t have to pay for, but may occur, such as eating out, a Netflix account or buying a ticket to the movies)
Unplanned expenses (fixing a vehicle or medical bills are examples. You can use past receipts and records to make an estimate of what these expenses might work out to on a monthly timeframe)
Savings (this includes short term savings that can be used in an emergency, as well as long term savings that might be used to purchase a car, or go towards retirement).
While this can be done easily with pen and paper, using a spreadsheet on a computer makes keeping track and updating your budget much easier. On paper (or the computer), try creating a different column for each category and list all of the items that fall under them. It can be helpful to list items in descending order with the highest dollar items at the top to make it easier to see what is having the greatest impact. Once you have the figures or estimates for these buckets you can put them together to form your budget. First, add up all of your expenses (fixed, flexible, unplanned) with your savings, we will call this Total expenses. Subtract Total expenses from your Income and you are left with what is called Net Income. If you have more money coming in each month than going out, your Net Income will be a positive number. With that number you can estimate what your Net income will be in two months, two years or two decades! The accuracy of that estimate will be less over time, as your income and expenses change, so a monthly budget might be best for estimating up to a few years.
(Total Income) – (Total Expenses) = Net Income
With a positive Net income, you can imagine a future of taking family vacations, going to college, or getting a drift boat. This can make you feel more secure, optimistic, and motivated to reach those goals. Unfortunately, many Americans are finding that at the end of the month more money has gone out than has come in, leaving their budget with a negative Net income. This can happen for a number of reasons including paying a disproportionate amount of your monthly income for things like rent, unexpected expenses, loss of income, or more recently, increasing inflation can play a role. In our next post, we will explore how financial uncertainty can cause stress (impacting your overall health), and what you can do to manage it and take steps toward improving your financial wellness.
AUTHOR: Brett Buesnel, AmeriCorps VISTA at Tillamook County Community Health Center